As an Amazon Associate, I earn from qualifying purchases

To remove a Lazy Susan, first empty its contents and then unscrew the mounting screws from the cabinet. Carefully lift the unit out after detaching it from its support.
Removing a Lazy Susan can streamline your kitchen’s functionality or make way for a new storage solution. This task requires a bit of DIY know-how, but it’s manageable with the right tools and a clear process. Before you start, ensure you have a screwdriver and possibly a flashlight to illuminate the cabinet’s interior.
The removal process involves clearing the space, locating the attachment points, and carefully detaching the turntable. Whether you’re replacing an old Lazy Susan or simply prefer a different storage method, understanding the removal process is essential. Keep reading for a step-by-step guide that will help you tackle this project with confidence.
Introduction To Lazy Susans
Lazy Susans serve a pivotal function in modern kitchens. These rotating shelves optimize storage and improve accessibility. Sometimes, a kitchen redesign or repair needs dictate the removal of a Lazy Susan. It is essential to understand the removal process to avoid damage. This guide assists homeowners in safely and effectively removing their Lazy Susan.
Preparation Steps
Preparing to remove a Lazy Susan starts with gathering the right tools. Ensure you have a screwdriver, wrench, and pliers. These are essential for the task. Additionally, don’t forget to wear protective gloves for safety.
Next, clear the space. Remove all items from the Lazy Susan shelves. This step prevents damage to your belongings. It also provides easy access to the mechanism below. Clearing the area allows for a smoother removal process.
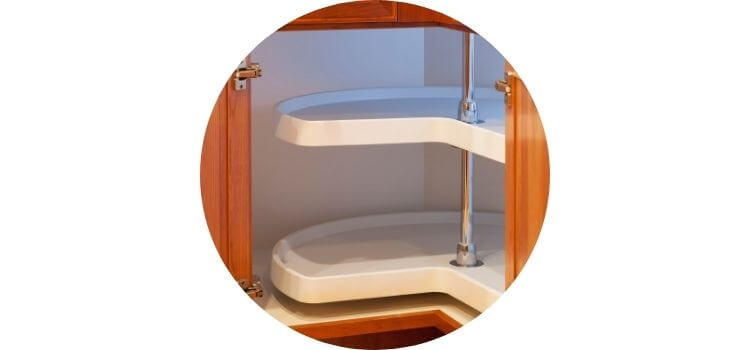
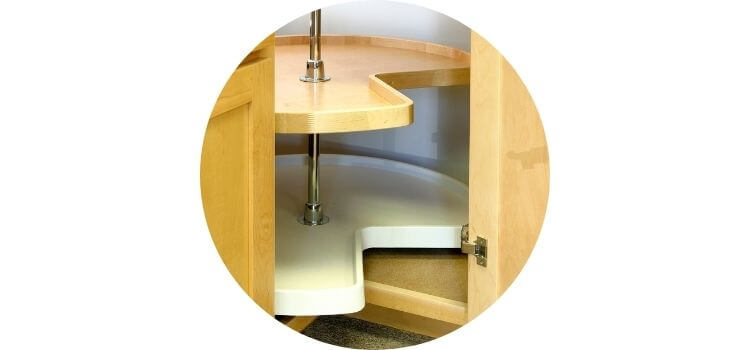
Identifying The Type Of Lazy Susan
Determine your Lazy Susan type before removal. Two main types exist: cabinet-mounted and shelf-mounted. Cabinet-mounted versions are attached to the cabinet door itself. Shelf-mounted ones rest on shelves and are not connected to the door. Knowing this will aid in the removal process.
To remove, first empty the Lazy Susan of all items. Next, locate the mounting brackets or clips that hold the unit in place. You may need a screwdriver or wrench for this task. Be gentle to avoid damage to the cabinet or shelf.
Initial Removal Steps
Before removing a Lazy Susan, clear all items from the shelves. This makes the process safer and easier. Next, detach the cabinet doors carefully. Unscrew the hinges that hold the doors in place. Keep the screws and hinges organized. This helps in reattaching the doors later.
Dismantling The Lazy Susan
Dismantling a Lazy Susan requires patience and the right tools. Start by emptying the shelves to make the task easier. Next, locate the mounting points, which are usually found either on the cabinet base or ceiling.
Using the correct screwdriver, gently unscrew each point. Take care not to strip the screws. Hold the Lazy Susan steady as you work to prevent it from falling.
Once all screws are removed, carefully lift the unit out. It may be helpful to have an extra pair of hands to assist with this step. Ensure you support the weight of the Susan as you lift it out to avoid damage.
Handling Potential Complications
Removing a Lazy Susan can present challenges, especially with stuck parts. Gently tap with a rubber mallet to loosen them. Patience is key during this process. Ensure safety by wearing protective gloves. If parts remain immovable, apply a penetrating oil and wait before attempting again.
Encountering unexpected configurations requires a flexible approach. Examine the mechanism closely. Identify any hidden screws or clips that may be holding the unit in place. Documentation or online resources can guide you through unique setups. If necessary, seek advice from a professional or the manufacturer’s customer support.
Post-removal Actions
After removing a Lazy Susan, it’s crucial to clean the space. Dirt and crumbs often hide underneath. Use a mild cleaner and a soft cloth to wipe the area. Ensure it’s completely dry before adding new cabinetry or another storage solution.
Next, inspect for any damage such as scratches or dents. Small imperfections may only need a bit of wood filler and paint. For bigger issues, like structural damage, seeking a professional might be best. It ensures a safe and aesthetically pleasing repair.
Alternatives And Considerations
Deciding to remove a Lazy Susan opens up many options. Replacing it with a new model is a common choice. Modern Lazy Susans come in various designs. They can greatly improve storage. Always measure your space before buying. This ensures a perfect fit.
Some prefer different storage solutions. Options like shelves or drawers can work well. These alternatives may offer better organization for your items. Think about what you store in your kitchen. Choose the option that suits your needs best.
Frequently Asked Questions
What Tools Are Needed To Remove A Lazy Susan?
To remove a Lazy Susan, you’ll need a screwdriver, a drill, pliers, and a flashlight. These tools help you access and unscrew the mounting hardware that keeps the Lazy Susan in place.
Can A Lazy Susan Be Removed Easily?
Yes, a Lazy Susan can usually be removed easily by unscrewing the mounting brackets and detaching the unit. Always ensure you support the weight while unscrewing to prevent injury or damage.
Are There Different Types Of Lazy Susans?
Yes, there are different types of Lazy Susans, including full-circle, kidney-shaped, and pie-cut. Each type may have a unique removal process depending on its installation method and mechanism.
How To Detach A Lazy Susan From Its Cabinet?
To detach a Lazy Susan from its cabinet, locate the mounting points, usually at the base and top. Unscrew these points with your tools and carefully lift the unit out of the cabinet.
Conclusion
Removing a Lazy Susan can be a straightforward task with the right tools and steps. We’ve covered the essentials, ensuring you can tackle the job with confidence. Keep this guide handy for a hassle-free removal process. Your kitchen will thank you for the newfound space and functionality.
Ready, set, DIY!
As an Amazon Associate, I earn from qualifying purchases
Pingback: Lazy Susan Vs Super Susan